Setting Up Planning Center Services for Your Ministry

One of the most useful tools in my ministry career is Planning Center. I reference it frequently in my posts about planning. As much as I love the program, it can be daunting to a first-time user. That’s why I wrote this post about Check-ins.
Setting up Planning Center Check-ins can be complicated. But Planning Center Services is on another level. There are so many options and tools. Even though I’ve been using the program for years, I know I haven’t fully maximized its potential. As I created this post, I found more tools I didn’t know existed. I’ll have to try them out later.
Services really shines in two things, volunteer management and order of service. Since I have almost no experience in planning a live worship set, I won’t talk about those tools. However, you can read it about in Planning Center’s own help articles here.
In this post, I’m going to show you how I set up Planning Center Services for my church that keeps all my volunteers engaged in their serve and know what’s happening during their service.
1. Service Types
When you first open the Plan tab in Services, it asks for a service type. Click Add Service Type to get started.

It’s not asking if your service is Traditional or Contemporary. Rather, think of these types as folders that contain the service order, volunteer positions, and teams.
I usually have three different service types. One for kids, one for adults, and one for youth. You can have unlimited service types, but I try to have at least one for each ministry that holds a service.
There were times when I had several service types for my kidmin. Mainly when my Wednesday night service was different from Sunday or planning the opening and closing to VBS.
Generally, create a different service type when you have a completely different service and team. You could combine all these into one service type, but I’ve found it’s much easier to manage when it’s split up.
2. Plan your Order of Service
Once you have a service type, it’s time to build an Order of Service. To do this, I like to create templates. Services has the ability to copy a service order and save as a template. So, before you make your first template, plan your first service.
To do that, click Add plan.

It’ll ask about times for you service and teams that you’d like to add. Don’t worry about this being exactly right. You can always change it later.

In the Order tab, click add your first item. A sidebar will open asking for more information.
This is the place where you put the title of the item, like a game, a song, or the sermon. Put your best guess for the time and whether it happens before, during or after the service. At the bottom of the menu, you can add notes, details, songs, media, files and more.
Since we’re building a generic template, leave this section blank. You can fill it in when you’re ready to plan your first service. Similarly, when putting in songs or the sermon, don’t worry about specifics. I like to use placeholders here with my best guess for how long each element will last.
Once all your service elements are placed. You can see how long your service will be. You can also click and drag each of these elements to adjust the order that suits you best. When I was in day-to-day kidmin, I liked to move around the game and small group time from week to week to keep things fresh. Each of my templates had those elements at different places. It seemed random to the kids, but every week was intentional.
3. Create Your Teams
Next click on the Teams tab. If you preselected teams, it’ll already be populated with those teams and how many people you need for each one. If you want to change the teams and what positions are available, you need to go to Manage Teams. It’s under the drop-down menu titled Team Actions on the far right. Manage Teams is the bottom button.

Once there you can see each team in the service type. You can always click the button the right to add another team if you like. Otherwise click on a team you want to edit. Under the Settings Tab there are a whole lot of options.

If you have one service, you don’t need to select anything under type. However, if you have two or more services, select Split Teams. This will make it easier to plan the same service but at different times. I keep all the default settings on the rest of the page. You can click around and play with what works best for you.
On the Members Tab, you can create/edit all the positions in the team. For kidmin, that can be Check-in, Worship Team, Small Group Leader, Host, Presenter, etc. You’re not putting in names yet, but you do want to place a team leader. This person gets all the notifications about confirming or declining volunteers. In addition, they get editing permissions for adding or removing team members.

When I’m first setting up a team, I put myself as the team lead and then the person who is actually managing the team. I want to make sure everything is working before I give it all away.
I haven’t played with automations in teams yet, but I’m sure there are many tools that are useful here.
Once you’re done with all your teams and positions, click Plans and navigate back to your service plan you started with. PCO still needs to work on this navigation. Good thing is, they’re always improving.
Now that your back on the Teams tab, the most useful button at this stage is Needed Positions. Under the drop-down menu titled Team Actions click Needed Positions.

This will open every team you selected with each position listed for that team. Under each position is a plus or minus sign. You can click those buttons to add or subtract how many people you need for that position at that service time. Once you’ve set all those positions, click done.
Now you have all the positions set and your generic order of service done. Don’t add names in yet. It’s time to create a template.
4. Create Templates
Click the Actions button above the Team Actions button on the top right and go to Export/Copy.

In the pop-up under the Export To menu click Template. Make sure you’re copying it to the correct service type. Then set the quantity to 4. Don’t worry about the name just yet. Once you’re done click submit.
You now have 4 templates with the same generic order and teams for each week of the month. On the top left, you’ll see Template Name, click this and change the name. I typically name it something obvious, like Week 1.
Next, got to the teams tab. In each position, click where it says Needed. A sidebar will open with all the people who are assigned to that team. If you don’t have anyone yet and/or need to add a person, scroll down to the bottom where it says Add New Person to [Team]. You can then type in the person's name in the dialog box.
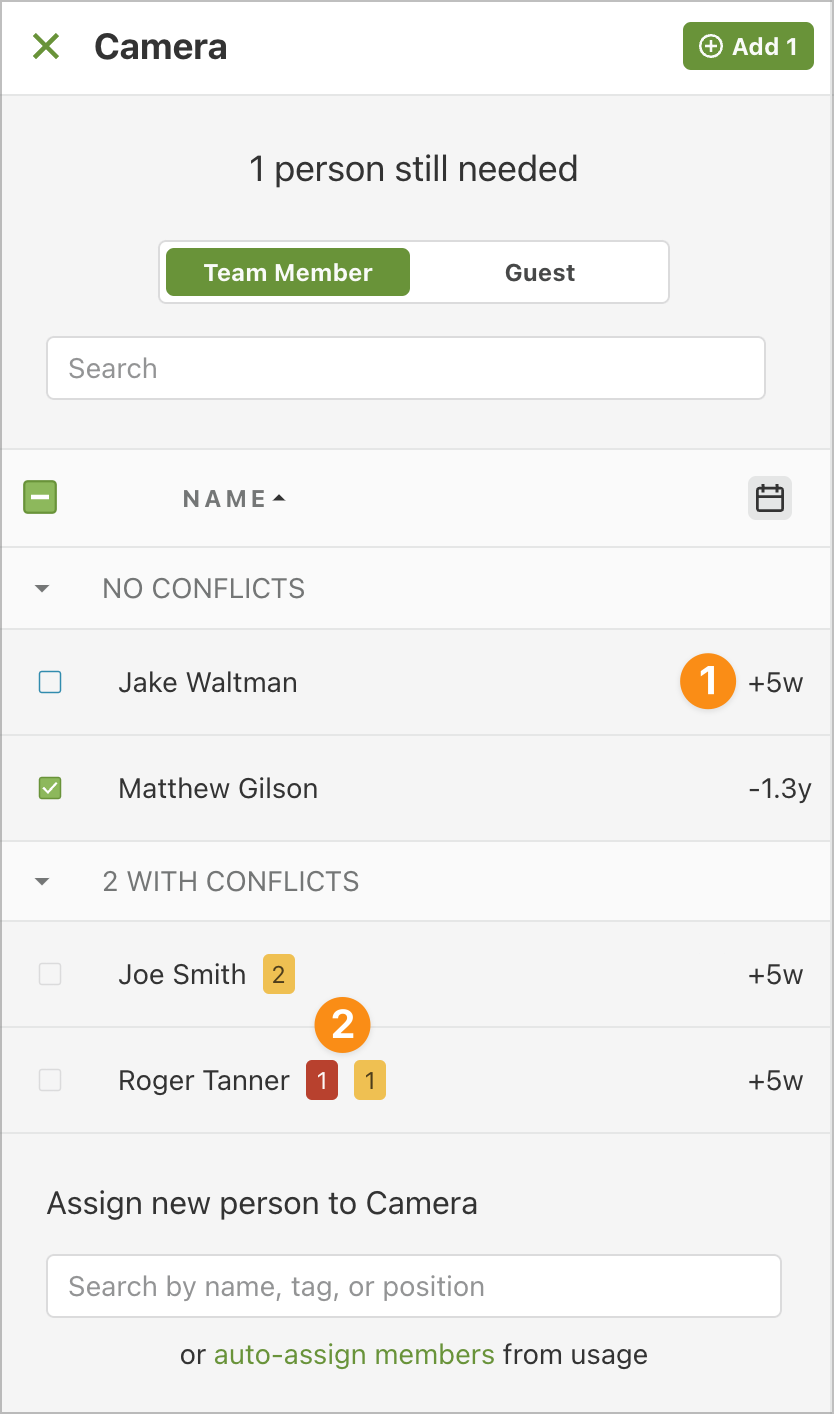
If they’re already in Planning Center Services, they’ll be added to the team automatically. If not, then you’ll need import them into Services provided they’re already in People. If it’s a brand-new person, a button will pop up that says add new person. Put in their information and you’re good to go.
A word of caution here. Services does cost money. You can add the first 5 for free and then it’s tiered after that. The program will warn you when your close to/hit your limit. If you’re going up a tier, make sure you talk to the money people before you start incurring additional monthly payments.
Once you’ve selected all the people for that position click Add at the top right of the sidebar. This person will now be scheduled for that position every time you select this template.
Continue to do this for each position and template until all 4 templates are completed.
You’re now ready to plan your first service.
5. Plan your service
Click the Plans Tab again and under your service type, click the Add Plan button. Instead of creating a generic plan as before, now you’ll use the template you just created. I like to create 4 services at a time, so under quantity select 4. Your times should be set from the first service you created. Under templates select the drop-down for each template you want to use. For instance, if you’re starting at the first Sunday of the month, you will select Week 1 for the first week, Week 2 for the second week and so on. Once all the templates are set, click Add.
Now you can click the date you want to edit, and the service plan will look just like the template you created. At this point, you can be specific with your games, music, and the like. I talk about what I include in this post.
Under the Teams tab, you can also adjust the team members as needed. But these should already be set from your template.
6. Email your Team
Now that your service is set, it’s time to share with your team your plans. Typically, I notify my volunteers twice. Once at the beginning of the month when I make all these plans and then again, a few days before their serve.
You can automate the reminder under the times tab in the service order. On the left, click the Times box. Here you can edit the times and send a reminder notification to each team assigned to the service type. Usually, I send a reminder 3 days out. If you have a pre-service meeting then you can add the time for that meeting here under the rehearsal tab. I add a reminder email for this too.
For the email at the beginning of the month, I like to send one mass notification. The best way to do this is to use the Matrix. It’s the button on the top right of the Service Type.

Once you click this button a new screen will open with all the services you currently have planned. You can add services before or after the initial time if you want to compare.
In the Matrix screen, you can see all the teams, the order, and who’s been notified for each service displayed. If there is a little envelope icon to the right of the name that means they haven’t been notified they’re on the schedule.
Once you have all the services laid out the way you want, click the mail/envelope icon on the top right of the screen.

A pop up will appear where you can select the teams you want to notify and how many plans you want to use. Once you have that set, click next.
The generic email is fine to use. I like to add a little more to it by talking about the focus for the month and any important announcements. Once you’re ready, click Send. Planning Center will then email each person individually their service requests. They can then choose whether or not they’re available to serve.
We’re over two thousand words here, so I'll talk about using Services in this post.
Planning Center Services has been a game changer for my ministry. I’ve deployed it in the last 3 churches I’ve served. It has a little bit of a learning curve, but once you get it set and running, it’ll make planning and scheduling your volunteers a whole lot easier.
If you need further help, you can leave a comment, search the help articles, or join a Planning Center Facebook group. This one is my favorite.
Happy Planning!